


[3.22] Corpse Explosion Autobomber - Ignite Proliferation Chieftain
|
[3.22] Corpse Explosion Autobomber - Ignite Proliferation Chieftain
This build leverages enemy HP scaling and corpse explosion mechanics from the new Chieftain ascendancy and Nghamu Warmonger tattoos to auto-proliferate powerful ignites across multiple monster packs. The result is a fast mapper that excels at speed farming high-density maps with a chill, low-APM playstyle. This build is relatively flexible in its gearing and its passive tree; this guide shows my preferred setup but feel free to modify at will. 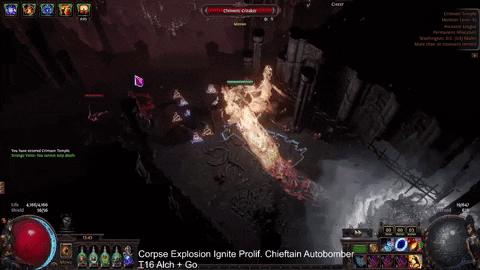 Build overview: This build centers around the new Chieftain ascendancy node "Hinekora, Death's Fury" which grants a 5% chance for enemies to explode on kill for a massive 500% of their life as fire damage. With 100% chance to ignite from the skill tree and the fact that monster life scales extremely high in the end-game, this huge amount of base fire damage is used to create powerful ignites. Those ignites are then reflected to the character through the use of The Fulcrum unique warstaff. We are able to survive these huge ignites thanks to the "unaffected by ignite" on the Chieftain ascendancy "Tasalio, Cleansing Water." We are then able to carry these massive ignites from enemy pack to enemy pack using ignite proliferation from a medium cluster jewel. For defenses, the Chieftain ascendancy also enables easy scaling of maximum elemental resistances, near 88 to 90% all elemental resistances depending on investment. Synergies between the chieftain ascendancy and the unique helmet The Formless Flame are used to generate a significant amount of armour. Recovery is a mixture of life regeneration and life gained on kill. To increase the mapping speed, the build relies on high uptime of several buffs: 25% movement speed from Adrenaline, 30% action speed from reverse-chill, and another 100+% from Mageblood flasks. The build can also be played without Mageblood, just losing some armour and movement speed. For quality of life, the duration of ignites is scaled to leave more time between map packs and area of effect is scaled to maximize the number of monsters hit by each explosion. The general playstyle involves starting the map by casting a skill with sufficient ignite DPS to kill a monster pack, proccing the corpse explosion, then running through the map as fast as possible to proliferate that explosion DPS to the rest of the map. Pros and cons:
Spoiler
Pros: · Ignite proliferation and explosions for fun and satisfying screen-wide clearing of endgame map packs · Exceptionally high movement speed for speed mapping, almost 300% MS · Tanky: >50k max elemental hit, >30k max physical hit · Crit immunity · Unnaffected by or otherwise mitigated elemental ailments · Low action-per-minute gameplay, just run through the map · Stun immunity · Uses mostly unique items for easy gearing · Access to lots of tattoo use for flexible gearing Cons · Have to keep moving to keep up ignites; loot fast or backtrack after map is cleared · Not league-start friendly · Feels best with Mageblood (though you can get away without it) · Recovery is best when you're consistently killing (Adrenaline uptime + life on kill) · Only really suitable for mapping; character won't really work for bosses, Sanctums, TotA, etc · Lower-than-preferred max HP due to using so many uniques Video Showcases: T16 alch + go with blue altars T16 80% delirious map showcase Path of Building: Pobb.in Pastebin Notes on the PoB- Don't pay too much attention to the DPS number; the DPS scales with monster life so it depends on the corpse that has been exploded. The good part about this is that the build will function just as well in a T16 map as it will in a T1 map. Build Stats: DPS that auto-scales with the enemies; use any ignite skill that you want; >4k life; 88-90% all elemental resistances; 7 endurance charges; >50k armour; ~ 300% movement speed Mechanics:
Spoiler
Self-Ignite with Proliferation
Spoiler
The crux of this build is the ability to create large ignites, move those ignites onto the player character, and then physically move the ignites around to other enemy packs using the player's movement. This is accomplished using two game mechanics: ignite reflection and ignite proliferation. To do the first, we use the unique warstaff The Fulcrum. While this item grants bonuses while we are inflicted with elemental ailments, we are using it solely for the line "elemental ailments you inflict are reflected to you." This means that any time we ignite an enemy, whether using one of our spell skills or via an enemy corpse explosion, the player character also receives an equal size and duration ignite. Importantly, we must be able to survive these ignites that we inflict on ourselves! Fortunately, the Chieftain ascendancy provides a source of "unaffected by ignite." Now that we have placed a strong ignite on ourselves, we need a way to spread it back to other enemies. This is done via ignite proliferation coming from a medium cluster jewel with the notable Fan the Flames. This causes the ignite to spread both from the corpses of dead enemies that were ignited as well as from ourselves to any enemy within a radius. This radius is scaled with our increased area of effect stat for quality of life. Creating Huge Ignites: Corpse Explosion
Spoiler
Ignite DPS depends on the amount of base fire damage in the ailment-producing hit. Since enemy HP scales extremely high in the endgame, we can leverage corpse explosion to create huge ignites since the base damage in the explosion is a percentage of the monster's life. There are several sources of corpse explosion used in the build. The most powerful ignites will come from the explosion ascendancy "Hinekora, Death's Fury." This causes an explosion with fire damage equal to 500% of the enemies HP. These explosions will easily result in DoT-capped ignite damage from endgame rares. The downside to these ignites is that the chance for it to occur is only 5%; therefore we don't want to rely solely on this proccing or we risk the powerful ignites falling off between map packs. The second ignite source comes from tattoos; we stack Nghamu Warmonger tattoos which each provide a 2% chance of explosion at 1/10th of the enemies HP. In my version of the build, I used 10 of the tattoos to reach 20% chance to explode; this virtually guarantees that every map pack will result in an explosion. While the damage from these explosions is lower than the ascendancy explosions, it is still high enough to quickly kill packs in the case that you were unlucky with the stronger explosions. Note that while only the strongest ignite is "active" at any given time on the character, the game still tracks all applicable ignites; this means that if your strong ignite falls off, there are "backup" ignites on your character that will automatically come into effect. Importantly, we must build in 100% chance to ignite on the character to ensure that every time a corpse explodes, it causes a large ignite. This can be accomplished in several ways. If you're using Mageblood, you can get a large chunk of ignite by using a flask with "% chance to freeze, shock, and ignite during effect." Otherwise, you can spec into the ignite clusters on the upper left part of the tree and use several cluster jewels with the "Cooked Alive" notable. To start the corpse explosion chain, we first need to be able to kill one enemy pack. You can use basically any fire damage spell skill in your 6-link to accomplish this. The optimal choice is probably Detonate Dead (with Desecrate / Unearth) but I have chosen to use Firestorm because I like the skill MTX :) Once you have created one corpse explosion ignite, you should be able to move plenty quickly to keep up those strong ignites. In the case that your ignite falls off while you're fighting a map boss, carry around a Vaal Breach gem which can be used to spawn monsters on demand to give you available enemies for corpse explosion. Damage Scaling
Spoiler
Damage scaling is straightforward in this build; a combination of % increased damage, fire damage over time multiplier, and reduction of enemy resistances is used. About 200% increased fire damage is achieved using fire damage and elemental damage passive tree wheels and a large fire damage cluster jewel. Another ~200% increased damage is achieved through the Adrenaline buff (coming from the Death's Rush unique ring) which has very high uptime thanks to the speedy build and from endurance charge scaling with Unyielding Forbidden Flesh/Flame jewels. Fire damage over time multiplier provides another avenue for scaling the ignite damage; most of it comes from the passive tree with a small amount coming from an implicit on gloves. Enemy resistance reduction acting as a more multiplier is achieved primarily by using two curses: Elemental Weakness and Flammability. Our amulet slot allows us to apply these two curses automatically by casting them as auras with no reservation, removing the downside of Blasphemy support. The annoint raises our curse cap from one to two. Even more resistance reduction can be found by inflicting fire exposure on enemies; this can be done on-hit with an eldritch glove implicit or can be applied to nearby enemies using a cluster jewel notable. Finally, scorch can be applied to nearby enemies using the Legacy of Fury unique boots. Since scorch is an elemental ailment, it will also be reflected to us but since we have so much fire resistance anyway, it is a very minor downside. Speed
Spoiler
This build is able to achieve ~300% increased movement speed through a combination of mechanics: reverse chill, Adrenaline and flask effect. Since the build already requires The Fulcrum, we already have the ability to self-chill. To take advantage of this, we wear the unique ring Winterweave which reverses the effect of chill on us; this acts as a 30% action speed increase while we are chilled. To reliably chill enemies (and therefore reflect it back to ourselves) we put Vortex on left click. Since we already need to be positioning ourselves close to enemies to proliferate ignites, we will frequently be hitting enemies with the Vortex chill effect. To maximize the probability of hitting an enemy with Vortex, we also build in a cast-when-damage-taken + Frostbolt setup which will make the Vortex sometimes proc on the Frostbolt projectiles for increased coverage. Another large source of movement speed is the Adrenaline buff; we have near perfect uptime on this buff since we're moving through the map and killing so quickly. Adrenaline cannot be gained while you already have it, so the uptime will never be 100% but as long as you keep moving it will be relatively high. Finally, the typical Mageblood + flask effect flasks setup is used to gain extreme action speed through the use of a quicksilver flask and silver flask for onslaught. For characters without Mageblood, just enchant your flasks with "used when full" instead of the "increased effect" mod. This will cost about ~50% movement speed but makes the build much more accessible at lower budgets. Defenses: Maximum Resistances
Spoiler
The chieftain ascendancy node "Valako, Storm's Embrace" makes modifiers to maximum fire resistance apply to all elemental resistances. This makes it extremely easy to reach 88-90% maximum elemental resistances. Nghamu Makanga tattoos can be used to easily stack maximum fire resistance. The setup near the Unwavering Stance keystone with the Warrior's Tale jewel provides +8% max res by itself. Alongside a high level Purity of Fire, you can reach 90% maximum elemental resistances. Defenses: Armour and Block
Spoiler
The chieftain ascendancy "Tasalio, Cleansing Water" incentivizes stacking fire resistance in order to ease gearing on the other elemental resistances. We can further leverage this to achieve additional defensive layers of armour and block. To scale armour, we use the Formless Flame unique helmet which increases our armour by our overcapped fire resistance (the amount of resistance we have above our maximum resistance). We can use a ruby flask and fill item suffixes with fire resistance to get as much overcapped fire resistance as possible. We don't have that much flat armour available since we're so invested in unique items, so Determination and aura effect are important to take advantage of this scaling. We additionally turn fire resistance into block chance by using the unique jewel "Red Nightmare." This jewel causes increases to fire resistance in its radius to also apply to block chance. Using this jewel on the bottom left of the tree and several of the +8% fire resistance jewels, we are able to get almost 50% block chance from a single jewel slot. Gear:
Spoiler
Uniques:
Spoiler
This build utilizes several niche mechanics and is therefore very heavy in uniques. On the positive side, this makes it easy to gear in a trade economy as you only really need to worry about one or two rares. On the otherhand, we several of the pieces don't come with flat life rolls and so our maximum life ceiling is relatively low. Additionally, it would be difficult to play this build in a league-start scenario due to low availability of uniques. Mandatory uniques are those enabling the ailment reflection mechanics. I consider Cloak of Flames to be best-in-slot because it offers a large defensive bonus in the physical-to-fire conversion but also significant quality of life from the increased ignite duration. The duration coming from this item makes it significantly easier to proliferate ignites between packs without them falling off of the player character. The Formless Flame is also a key defensive piece, providing most of the armour for the build. Without this piece of gear you will have a hard time against physical hits. As discussed in the mechanics section, the amulet allows us to run to offensive curses as auras for significantly enhanced quality of life. Not only does it solve remove their reservation entirely, it also allows us to use an increased area of effect support gem with the curse auras that would otherwise make the reservation unnacceptably high. Uniques that could be considered optional are the second ring slot, the boots, and the belt. Death's Rush feels very good to use due to the large amount of life recovery and movement speed that it generates. You could however use a rare ring to instead increase your maximum life pool and ease gearing from your other rares. Alternatively, you could consider using Call of the Void to make all damage chill and guarantee uptime on the reverse chill mechanics. The unique boots are an offensive option which provide enemy resistance reduction and even more damage proliferation through the on-kill burn effect. Rare boots would be a fine option for more defensive gearing though. Finally, Mageblood is obviously very strong but requires a high investment. I have chosen to use a Caspiro Elegant Hubris timeless jewel in order to remove all stat requirements and make room for more tattoos on the passive tree. Look for a timeless jewel seed which provides "Eternal Resilience" at one of the 30 stat passive nodes near Avatar of Fire for easy access; this notable is very important because its the only source of endurance charge generation. Rares:
Spoiler
I only use one rare piece of armour in my setup; the gloves. Important rolls are chaos resistance which is otherwise very hard to find and fire resistance for scaling our armour. You definitely want a high life roll since there are few other sources for it in this build. If you choose to use rare boots or drop Mageblood, look for gear with flat life, chaos resistance, fire resistance, life regeneration, and flat armour. Flasks:
Spoiler
Flasks are flexible to fit your personal build's needs. If not using Mageblood, replace the enchant with "flasks are used when charges reach full." Good choices are flasks/suffixes that grant armour, movement speed, and fire resistance. If you have access to Progenesis, it can be very useful for increasing the eHP of the character along with a small amount of recoup on the tree. If not using Progenesis, you don't need to spec into the Infused Flesh wheel. Alternative flask options would be Cinderswallow Urn for more recovery or Oriath's End for more consistent explosions. Gem Setups:
Spoiler
6-link ignite setup:
Spoiler
Pick whatever skill that you like in order to start the ignite chain. I have chosen to use: Firestorm > Burning Damage support > Deadly Ailments > Swift Affliction > Lifetap > Unbound Ailments Whatever you choose to go with, you'll probably want Lifetap to manage your skill costs easily. Auras:
Spoiler
Enlighten > Malevolence > Purity of Fire > Determination A level 3 enlighten is needed to afford the mana reservation. We run Malevolence as an offensive aura which is a more multiplier for damage over time. Two defensive auras are used: Purity of Fire increases all three of our maximum elemental resistances and Determination provides flat armour and armour scaling. Curse Auras:
Spoiler
Since we're using an "uber" Impresence, we can run two curse auras for free. Elemental Weakness and Flammability are the obvious offensive options. Since the curses have no reservation, we can link them to increased area of effect for more quality of life. Awakened Blasphemy > Anomalous increased area of effect > Elemental Weakness > Flammability Self-chill application:
Spoiler
We use two setups for chill application which will be reflected to ourselves. First, there is a Vortex setup with scaled ailment effect. We link to lifetap to manage skill costs. Vortex > Unbound Ailments > Lifetap Second, there is a Frostbolt setup with cast-when-damage-taken which will occasionally fire out projectiles for vortex to consume for increased vortex coverage. Make sure you keep the level requirements of the other gems under that of CWDT. CWDT > Frostbolt > Greater Multiple Projectiles > Lifetap Movement skill:
Spoiler
Leap slam linked to faster attacks is the smoothest choice for a movement skill since we have so much action speed from all our other mechanics. We socket this alongside the Vortex setup so that Lifetap can be shared between the two. FAQ:
Spoiler
Q: Pantheon? A: Use Brine King for the freeze immunity but DO NOT UNLOCK REDUCED EFFECT OF CHILL otherwise you will nerf the effectiveness of the reverse-chill effect. For minor pantheon, go with Garukhan for reduced effect of shock. You can reach 100% reduced shock effect using jewel corruptions, etc. My Other Build Guides: Ethical Crit Impending Doom + Hexblast Occultist: The 6699 Build Eye of Winter Triggerbot Assassin: >5000 projectiles per second Sacrifice Ignite Pathfinder: self-cast Blackflame Hexblast Thank you for your interest in my build; if you have questions or suggestions feel free to drop them in the posts below. I try to check at least semi-regularly. If you would like to see more content of this type the best way you can support me is by subscribing to my Youtube channel. Thanks again! Zuletzt bearbeitet von _Atollo_#3775 um 04.11.2023, 14:13:25 Zuletzt angestoßen am 26.01.2024, 14:58:15
|
|
|
Reserved for additions by author.
DudeAbides420 has created a magic find version of the build if you’re interested in going in that direction : https://www.pathofexile.com/forum/view-thread/3435169 Zuletzt bearbeitet von _Atollo_#3775 um 30.09.2023, 21:06:37
|
|
|
Hi there! due to the price skyrocket for fulcrum, if i have 35 divine and can only afford the fulcrum, would this build still be viable?
|
|
" The Fulcrum is the only absolutely mandatory unique. Cloak of Flames isn’t absolutely necessary but I think it’s the best option by far. You DONT need a 6 link, you can get by on a five link but it will just take a bit longer to start the ignite chain. That should be under a few divines then. Most other uniques are under 50c. You could start with The Fulcrum, Formless Flame, Cloak of Flame, clusters, and the unique rings and assemble the rest of the pieces as you go. The cluster jewels don’t need to be perfect, just make sure you’re getting 100% chance to ignite. The jewels and fire resistance tattoos are about 1 div each but these can be incremental upgrades. |
|
|
Thanks for guide! Can this build survive on simulacrum wave 25-30 with HH and Progenesis?
|
|
" I’ve run the build without modifications up to wave 24 or 25 while working on my 40/40. It’s honestly not that strong for simulacrum in my opinion. The biggest issue is getting the ignite explosion chain going at the beginning of waves (in later waves). If you switched to something like unearth / detonate dead for starting the chain, it might go a little better. Once it gets rolling it feels ok but the damage reduction in late waves is noticeable. Since a big chunk of recovery is based on killing “recently” if you don’t get the first few packs killed quickly, you’ll pop. I have not tested the build with Headhunter. I don’t suspect it’ll make a big difference offensively; most of the explosions are fire damage so don’t benefit from HH phys conversion and the headhunter buffs don’t do much for DoT DPS |
|
|
Do you know if the "pseudo proliferation" effect from legacy of fury, that has a base radius of 30 units, gets affected by increased aoe modifiers? Also, the dmg gets increased by area dmg, fire dmg, etc.?
Culler-support build: https://www.pathofexile.com/forum/view-thread/1617230
Dedicated support build https://www.pathofexile.com/forum/view-thread/1702757 |
|


