[3.8] Fast Storm Brand Leveling Guide | League Starter | HC/SC
|
Intro
Hello, thanks for checking out this complete leveling guide for Storm Brand Elementalist. The purpose of this guide is to help players such as yourself to get through A1-A10 in much quicker times, especially useful at a league start when those that get to maps first often profit the most. The guide provides 'Gem Links and/or sockets' sections to let you know of what your ideal gem setup looks like and will be included everytime there has been a gem or link change. At the end of each act (and before Merciless Labyrinth) there is a 'Passive Tree' section which includes a link to the official Path of Exile Passive Tree Planner, the name of the tree in Path of Building, and a handy little image if you don't want to use either. The guide is designed for getting you to maps, after that I will no longer be able to help, however there are other fantastic guides on the forum and YouTube for Storm Brand based builds. Here's a couple of my favourites:
I'd also like to give big thanks to jeipei89 for the fantastic written leveling guide that I had much of my inspiration from. Of course big thanks to Zizaran for bringing forward a complete 'Racing/Leveling Guide & Commentary'. Final thanks goes to one of my Guild members, Beverin, who I'm hoping will be able to use this guide to unleash his full potential. Thanks, Sherman
Path of Building
https://pastebin.com/vtsZRm9D Just simply import into Path of Building and select the relevant tree in the bottom left. Colour Key > Go somewhere (walking/teleport) + Do something (find/help/lab/waypoint/kill) + Kill something (boss) < Return to town and complete quest (Take this reward)
ACT 1
Start with a Scion first, who will act as a mule for us to get a free Onslaught from the first mission. + Kill Hillock < Tarkleigh Check vendors for B-B-G (or B-G-G) wand and movement speed boots. Place all items into personal stash. Log onto Witch. + Kill Hillock < Tarkleigh (Freezing Pulse) Check vendors for B-B-G (or B-G-G) wand and movement speed boots. Buy Explosive Trap.
Gem Links and/or sockets
B-B-G (Freezing Pulse - Arcane Surge (lvl 1) - Onslaught) G (Explosive Trap) - OR - B-G-G (Freezing Pulse - Explosive Trap - Onslaught) > The Coast + Get WP > Mud Flats + Find 3 eggs > The Submerged Passage + Get WP > The Coast > The Tidal Island + Kill Hailrake < Nessa (Quicksilver Flask) & Tarkleigh (Frost Bomb) Buy Frostblink Swap Freezing Pulse out for Frost Bomb
Gem Links and/or sockets
B-B-G (Frost Bomb - Arcane Surge (lvl 1) - Onslaught) G (Explosive Trap) B (Frostblink) - OR - B-G-G (Frost Bomb - Explosive Trap - Onslaught) B (Frostblink) > The Submerged Passage > The Ledge + Get WP > The Climb > The Lower Prison + Get WP + Complete Lab (1/6) > Lioneye's Watch Buy Added Lightning Damage.
Gem Links and/or sockets
B-B-G (Frost Bomb - Arcane Surge (lvl 1) - Onslaught) G-B (Explosive Trap - Added Lightning Damage) B (Frostblink) > The Lower Prison > The Upper Prison > The Warden's Quarters > The Warden's Chambers + Kill Brutus < Tarkleigh (Flame Dash) Use Vendor Recipe to create a '+1 to Lightning gems' wand. Make sure your B-B-G wand is magic first. Vendor the Spectral Throw (from Scion mule) + Iron Ring = Topaz Ring. Vendor Magic B-B-G wand + Topaz Ring + Orb of Alteration. > Prisoner's Gate > The Ship Graveyard + Get WP > The Ship Graveyard Cave + Get All Flame > The Ship Graveyard > The Cavern of Wrath + Get WP > The Ship Graveyard + Kill Fairgraves < Bestel Buy Blade Vortex.
Gem Links and/or sockets
B-B-G (Frost Bomb - Arcane Surge (lvl 1) - Onslaught) G-B (Explosive Trap - Added Lightning Damage) G (Blade Vortex) B (Flame Dash) OR (Frostblink) > The Cavern of Wrath > The Cavern of Anger > Merveil's Lair + Kill Merveil
Passive Tree
PoE Website Path of Building: 'End of Act 1' tree 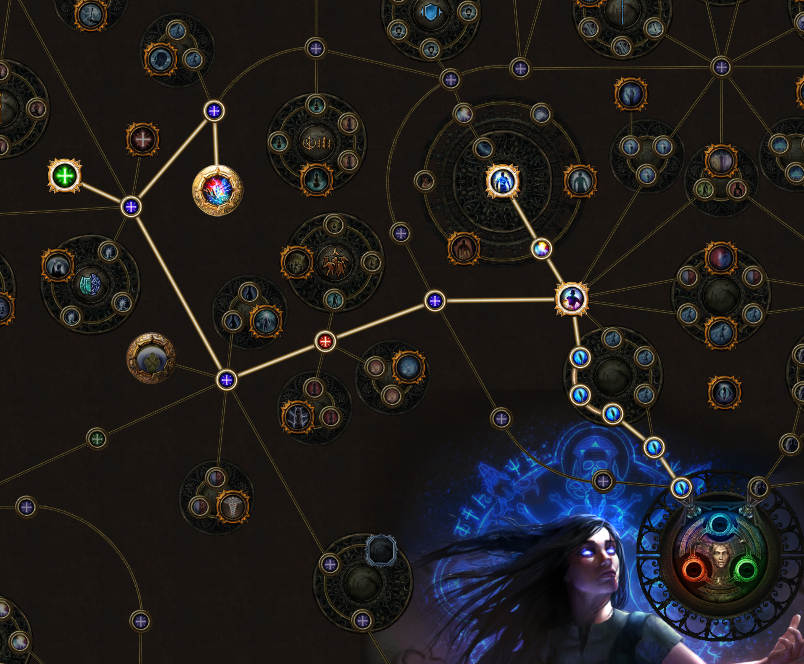
ACT 2
Buy Storm Brand.
Gem Links and/or sockets
B-B-G (Storm Brand - Added Lightning Damage - Onslaught) B-B (Flame Dash - Arcane Surge (lvl 1)) G (Explosive Trap) G (Blade Vortex) > The Southern Forest > The Forest Encampment > The Old Fields > The Den + Kill the Great White Beast > The Old Fields > The Crossroads + Get WP > The Fellshire Ruins > The Crypt + Complete Lab (2/6) < Yeena (Quicksilver Flask) Now is a good chance to prepare for Fidelitas by equipping a Topaz ring. > The Crossroads > The Chamber of Sins Level 1 + Get WP > The Chamber of Sins Level 2 + Complete Lab (3/6) + Kill Fidelitas & take Baleful Gem < Greust (Herald of Thunder) Buy Brand Recall and Herald of Ice
Gem Links and/or sockets
B-B-G (Storm Brand - Added Lightning Damage - Onslaught) B-B (Brand Recall - Arcane Surge (lvl 1)) B (Flame Dash) G (Blade Vortex) G (Herald of Ice) B (Herald of Thunder) > The Crossroads > The Broken Bridge + Kill Kraityn > Forest Encampment > The Riverways + Get WP > The Wetlands + Kill Oak + Get WP > The Riverways > The Western Forest + Help Alira + Kill the Blackguards & open Thaumetic Seal > The Submerged Passage (ACT 1) > The Flooded Depths + Kill the Dweller of the Deep < Bestel & Tarkleigh (ACT 1) > The Western Forest > The Weaver's Chambers > The Weaver's Nest + Kill the Weaver & take Maligaro's Spike < Silk (Faster Casting) Buy another Faster Casting
Gem Links and/or sockets
B-B-G (Storm Brand - Faster Casting - Onslaught) B-B (Brand Recall - Arcane Surge (lvl 1)) B-B (Flame Dash - Faster Casting) G-B (Blade Vortex - Added Lightning Damage) G (Herald of Ice) B (Herald of Thunder) > The Wetlands + Open Tree Roots > The Vaal Ruins + Break the Seal > The Northern Forest + Get WP > The Caverns + Get WP > The Ancient Pyramid > Pyramid Apex + Kill Vaal Oversoul
Passive Tree
PoE Website Path of Building: 'End of Act 2' tree 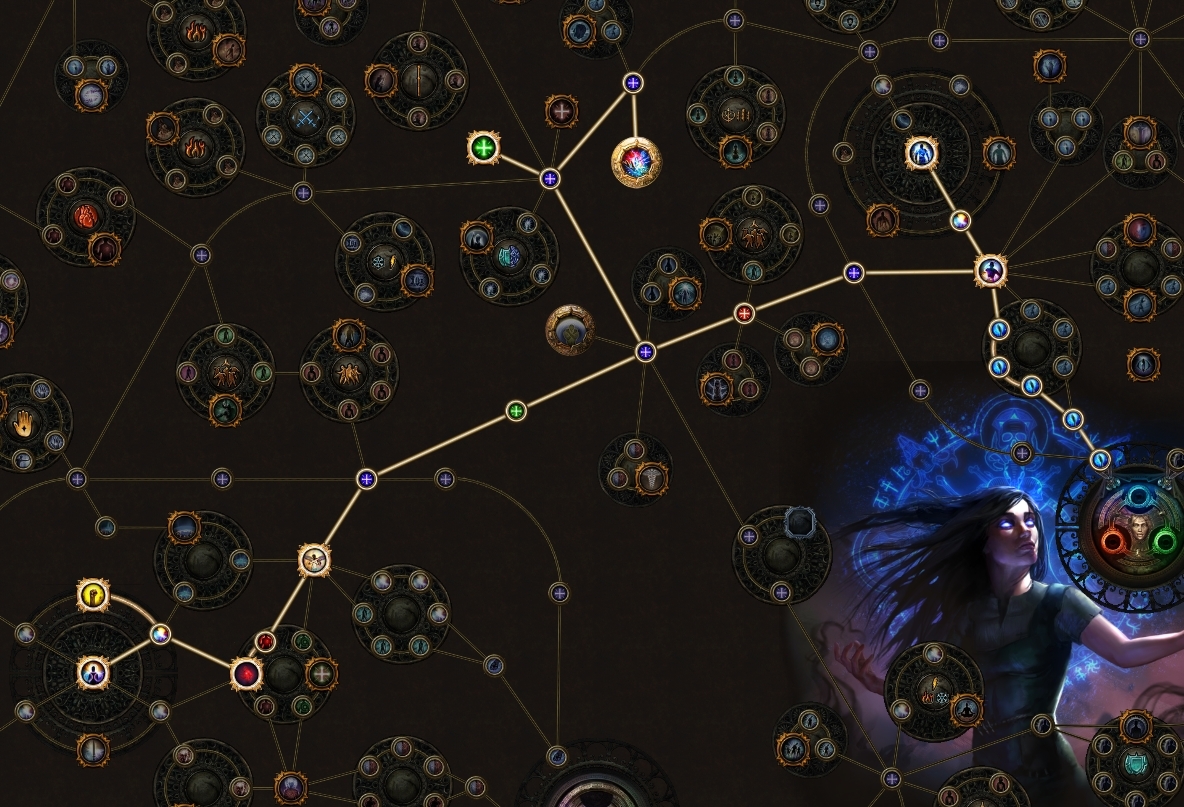
ACT 3
Consider using a Jade Amulet soon to keep up with Blade Vortex dexterity requirements. > The City of Sarn + Kill the Guards & talk to Clarissa > The Sarn Encampment > The Slums > The Crematorium + Get WP + Complete Lab (4/6) + Kill Piety & take Tolman's Bracelet < Maramoa (Conductivity) & Clarissa > The Slums + Open Sewer Crating > The Sewers + Find first Platinum Bust + Get WP + Find second and third Platinum Busts > The Marketplace + Get WP > The Catacombs + Complete Lab (5/6) > The Marketplace > The Battlefront + Open Blackguard Chest & take Ribbon Spool > The Docks + Open Supply Container & take Thaumetic Sulphate > The Battlefront > The Solaris Temple Level 1 > The Solaris Temple Level 2 + Get WP < Hargan + Talk to Lady Dialla (Jade Amulet + Infernal Talc) > The Sewers + Unblock Undying Passage > The Ebony Barracks + Get WP + Kill General Gravicius > The Lunaris Temple Level 1 + Get WP Start checking for 4 link items at Hargan (B-B-B-G & B-B-B-B) Buy Lightning Spire Trap - aim to be level 28 before fighting Piety, to be able to use Lightning Spire Trap Now is also a good time to consider getting 'of Staunching' suffix on a health flask to gain bleed immunity for labyrinth and Dominus. An instant life flask is advised. > The Lunaris Temple Level 2 + Kill Piety & take Tower Key < Grigor > The Ebony Barracks > The Imperial Gardens + Get WP > The Library + Get WP > The Archive (loose candle on wall) + Find 4 Golden Pages > The Library + Talk to Siosa Buy Innervate Support
Gem Links and/or sockets
B-B-B-G (Storm Brand - Faster Casting - Innervate - Onslaught) B-B (Brand Recall - Arcane Surge (lvl 1)) B-B (Flame Dash - Faster Casting) G-B (Blade Vortex - Added Lightning Damage) G (Herald of Ice) B (Herald of Thunder) B (Lightning Spire Trap) > The Imperial Gardens + Complete Lab (6/6) > The Sarn Encampment > The Aspirant's Plaza + Complete Normal Labyrinth PoE Lab notes Ascend to Elementalist and take Shaper of Desolation Buy Elemental Focus, Controlled Destruction and Added Lightning Damage Check elemental resistances, missing resists can be fixed by buying a Two-Stone Ring from Clarissa
Gem Links and/or sockets
B-B-B-G (Storm Brand - Faster Casting - Innervate - Onslaught) B-B-B-B (Lightning Spire Trap - Elemental Focus - Controlled Destruction - Added Lightning Damage ) B-B (Brand Recall - Arcane Surge (lvl 1)) B-B (Flame Dash - Faster Casting) G-B (Blade Vortex - Added Lightning Damage) G (Herald of Ice) B (Herald of Thunder) > The Imperial Gardens > The Sceptre of God + Get WP > The Upper Sceptre of God > Tower Rooftop + Kill Dominus > The Aqueduct > Highgate
Passive Tree
PoE Website Path of Building: 'End of Act 3' tree 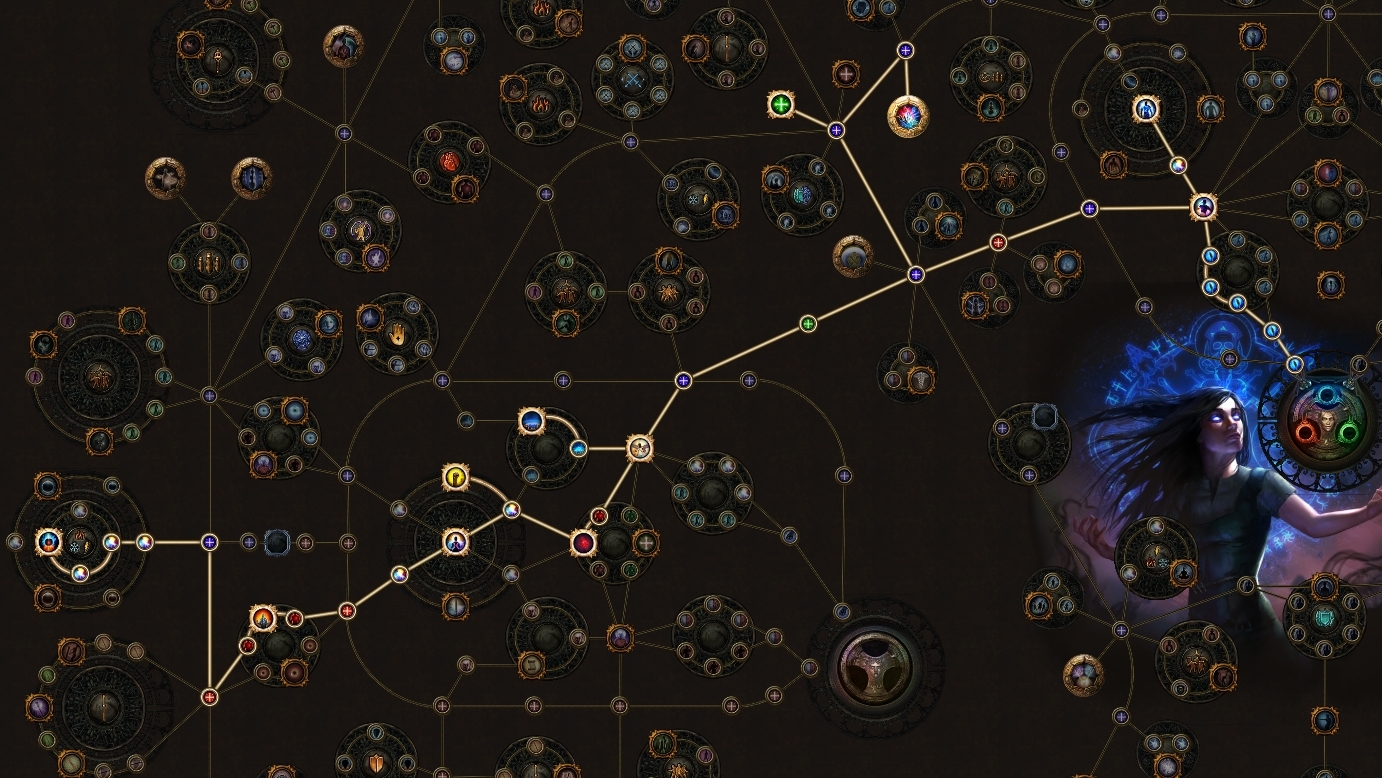
ACT 4
Blade Vortex no longer needed once Lightning Spire Trap is in a 4l, but if you have a spare G-B, keep it around, it will still be useful for the next few boss encounters > The Dried Lake + Kill Voll & take Deshret's Banner > Highgate + Open The Mines > The Mines Level 1 > The Mines Level 2 + Release Deshret's Spirit > The Crystal Veins + Get WP At this point, if you have low cold resist, go to Kaom first, if you have low fire resist, go to Daresso first. If both are capped, follow as stated. > Kaom's Dream > Kaom's Stronghold + Get WP > The Crystal Veins > Daresso's Dream > The Grand Arena + Get WP > The Ring of Blades + Kill Daresso & take The Eye of Desire > Kaom's Stronghold > Caldera of the King + Kill Kaom & take The Eye of Fury < Tasuni > The Crystal Veins + Talk to Lady Dialla > The Belly of the Beast Level 1 > The Belly of the Beast Level 2 > The Bowels of the Beast + Kill Piety > The Harvest + Get WP + Kill Maligaro & take organ + Kill Shavronne & take organ + Kill Doedre & take organ > The Black Core + Kill Malachai < Dialla (Multiple Totems) & Oyun (Lightning Golem)
Gem Links and/or sockets
B-B-B-G (Storm Brand - Faster Casting - Innervate - Onslaught) B-B-B-B (Lightning Spire Trap - Elemental Focus - Controlled Destruction - Added Lightning Damage ) B-B (Brand Recall - Arcane Surge (lvl 1)) B-B (Flame Dash - Faster Casting) G (Herald of Ice) B (Herald of Thunder) B (Lightning Golem) Optional G-B (Blade Vortex - Added Lightning Damage) > The Ascent + Click Lever > Oriath Portal
Passive Tree
PoE Website Path of Building: 'End of Act 4' tree 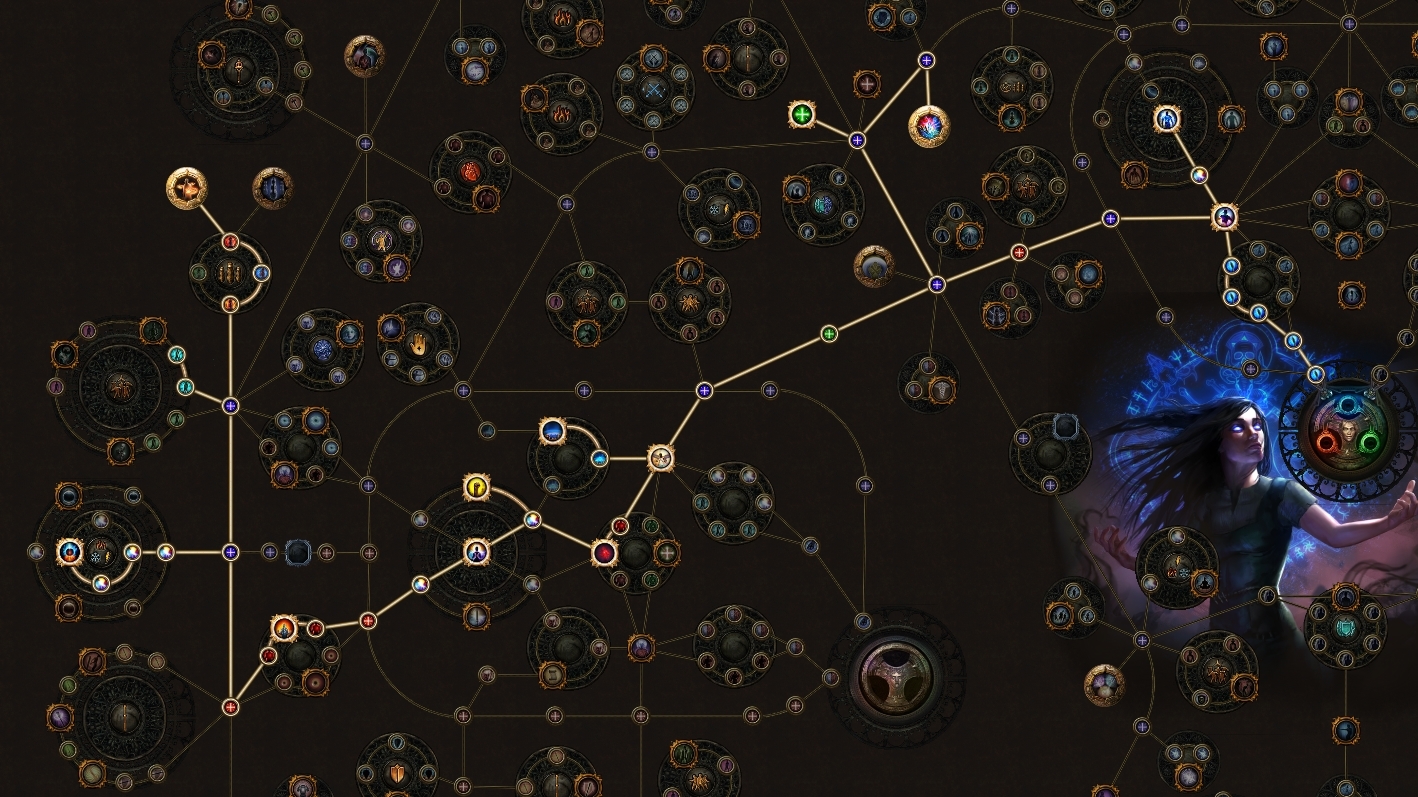
ACT 5
> The Slave Pens + Kill Overseer Crow > Overseer's Tower > The Control Blocks + Find Miasmeter + Kill Justicar Casticus & take Eyes of Zeal > Oriath Square + Get WP < Lani (Silver Flask) & Vilenta > Oriath Square > The Templar Courts > The Chamber of Innocence + Get WP > The Sanctum of Innocence + Kill High Templar Avarius > The Chamber of Innocence > The Torched Courts > The Ruined Square + Get WP > The Ossuary + Find Sign of Purity > The Ruined Square > The Reliquary + Find Kitava's Torments < Lani > The Ruined Square > The Cathedral Rooftop > The Cathedral Apex + Kill Kitava + Talk to Lily > Sail to Wraeclast
Passive Tree
PoE Website Path of Building: 'End of Act 5' tree 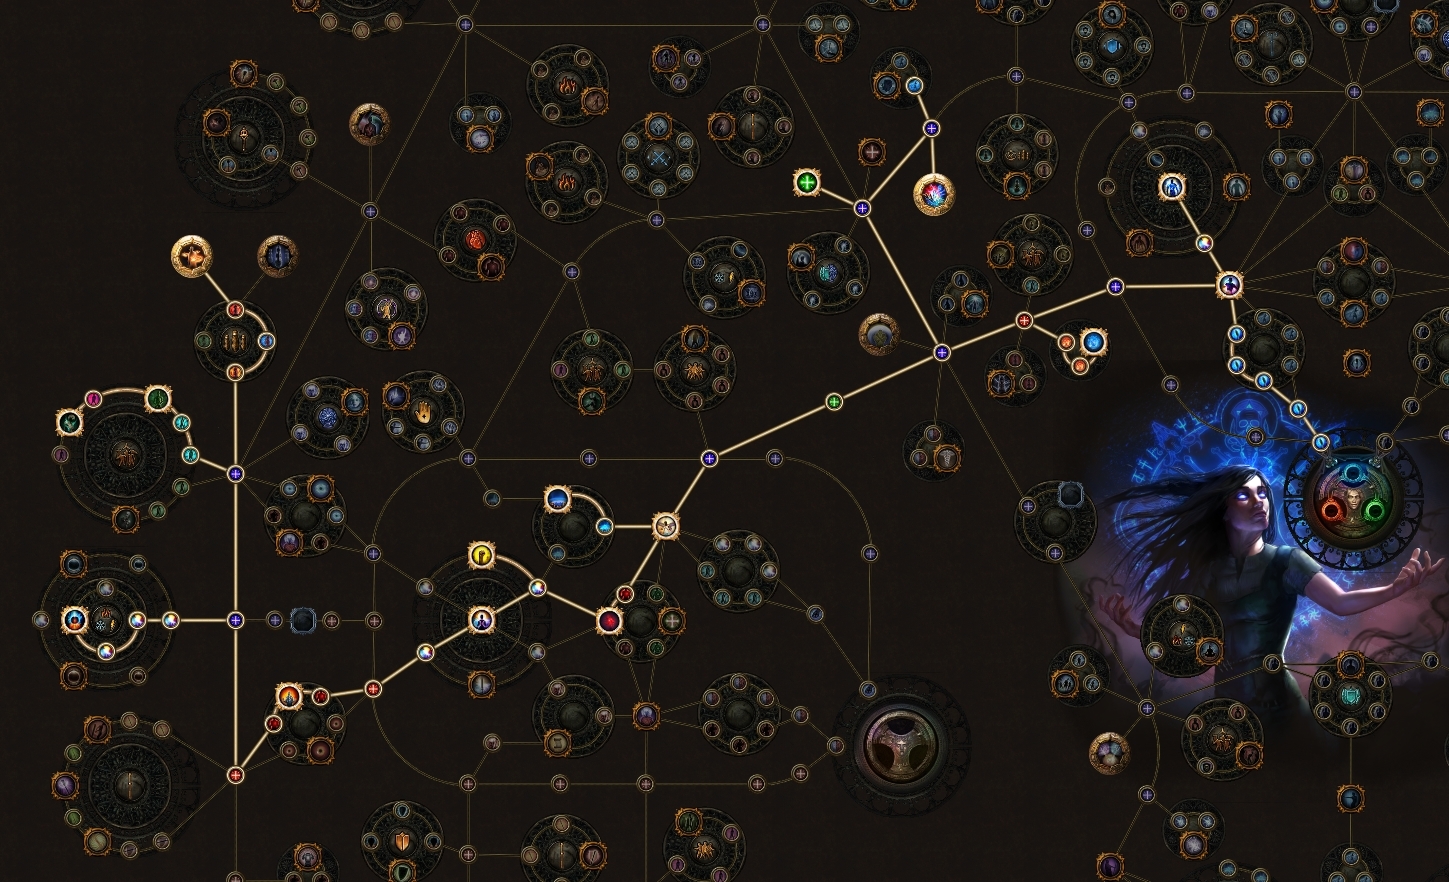
ACT 6
Look at fixes to resistances, new rings, new armour, craft any missing resists using the Crafting Bench. > The Twilight Strand + Clear the Strand < Lily Buy War Banner and Ice Bite
Gem Links and/or sockets
B-B-B-G (Storm Brand - Faster Casting - Innervate - Onslaught) B-B-B-B (Lightning Spire Trap - Elemental Focus - Controlled Destruction - Added Lightning Damage ) B-B (Brand Recall - Arcane Surge (lvl 1)) B-B (Flame Dash - Faster Casting) G (Herald of Ice) B (Herald of Thunder) B (Lightning Golem) R (War Banner (lvl 2)) > The Coast + Get WP > The Tidal Island + Find Bestel's Manuscript < Bestel (Citrine Amulet) > The Coast > The Mud Flats + Kill The Dishonoured Queen & take Eye of Conquest > The Karui Fortress > Tukohama's Keep + Kill Tukohama > The Karui Fortress > The Ridge + Get WP > The Lower Prison + Get WP + Complete Lab (1/3) > Shavronne's Tower > Prison Rooftop + Kill Shavronne & Brutus > The Warden's Chambers < Tarkleigh If you have a low life pool, take Mind over Matter next, and disable Herald of Thunder, this will help with your eHP until finding better gear. If your life pool is high enough, rocket on and ignore this. > Prisoner's Gate > The Western Forest > The Riverways + Get WP > The Southern Forest + Get WP > The Cavern of Anger + Open chest & take The Black Flag > The Beacon + Get WP + Escort the 2 pillars to refuel + Click Ignition Switch + Click The Beacon + Talk to Weylam > Sail to The Brine King's Reef + Get WP > The Brine King's Throne + Kill The Brine King + Talk to Weylam > Sail to The Bridge Encampment Take Brine King's Pantheon
Passive Tree
PoE Website Path of Building: 'End of Act 6' tree 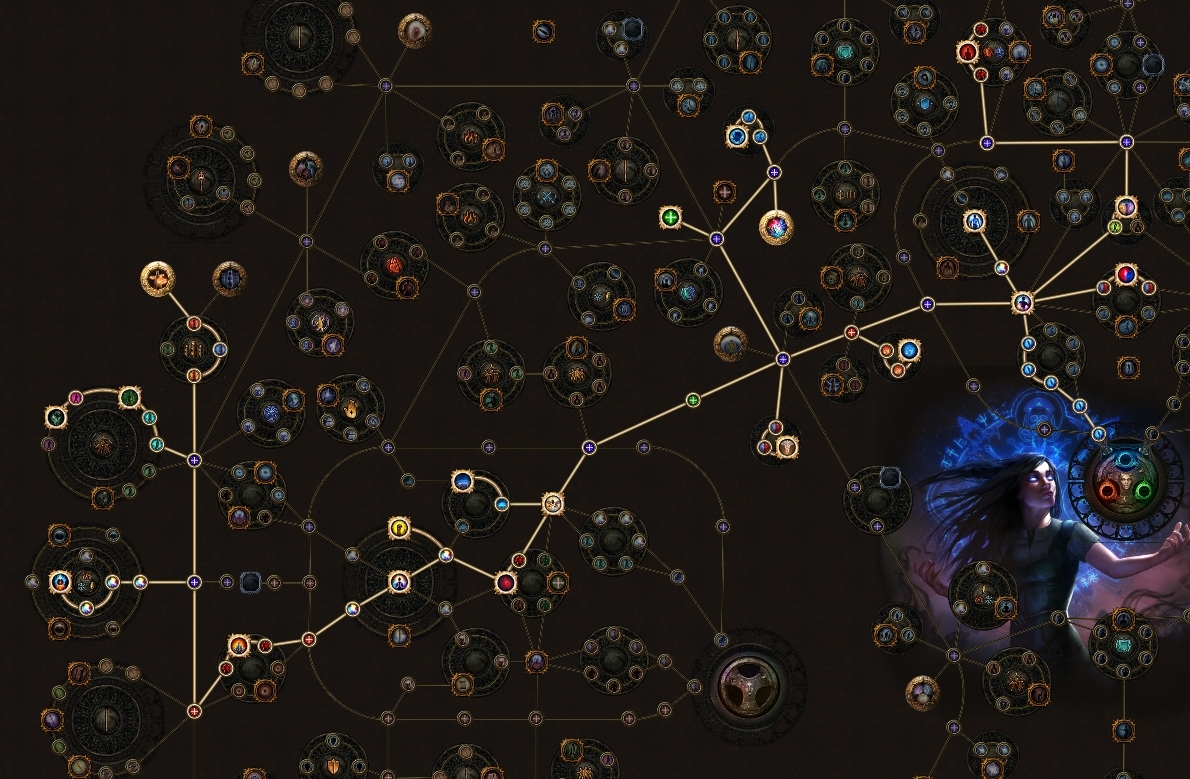
ACT 7
> The Broken Bridge + Open Dirty Lockbox & take Silver Locket > The Crossroads + Get WP > The Fellshire Ruins > The Crypt + Get WP + Complete Lab (2/3) + Open Sarcophagus > Stairs + Open Container of Sins & take Maligaro's Map < Weylam (Granite Flask) > The Crossroads > The Chamber of Sins Level 1 + Get WP + Open Maligaro's Map with map device > Maligaro's Sanctum > Maligaro's Workshop + Kill Maligaro & take Black Venom < Silk (Obsidian Key) - In Chamber of Sins Level 1 > The Chamber of Sins Level 2 + Complete Lab (3/3) > The Den > The Ashen Fields > The Forest Encampment + Kill Greust < Helena (Greust's Necklace) Take Ralakesh & Brine King Pantheon > The Aspirant's Plaza + Complete Cruel Labyrinth PoE Lab notes - Look for Darkshrines to make it easier Take Beacon of Ruin Swap Onslaught for Ice Bite in Storm Brand setup, use Silver Flask This will be the FINAL change for gem links/sockets for leveling purposes.
Gem Links and/or sockets
B-B-B-G (Storm Brand - Faster Casting - Innervate - Ice Bite) B-B-B-B (Lightning Spire Trap - Elemental Focus - Controlled Destruction - Added Lightning Damage ) B-B (Brand Recall - Arcane Surge (lvl 1)) B-B (Flame Dash - Faster Casting) G (Herald of Ice) B (Herald of Thunder) B (Lightning Golem) R (War Banner (lvl 2)) > The Northern Forest + Drop portal next to The Dread Thicket + Take Greust's Necklace to the Azmeri Shrine > The Causeway + Get WP + Open Kishara's Lockbox & take Kishara's Star > The Vaal City + Get WP < Helena & Weylam Use portal to get back to The Northern Forest near The Dread Thicket > The Northern Forest > The Dread Thicket + Find all Fireflies < Eramir > The Vaal City + Talk to Yeena > The Temple of Decay Level 1 > The Temple of Decay Level 2 > Arakaali's Web + Kill Arakaali > The Sarn Ramparts > The Sarn Encampment
Passive Tree
PoE Website Path of Building: 'End of Act 7' tree 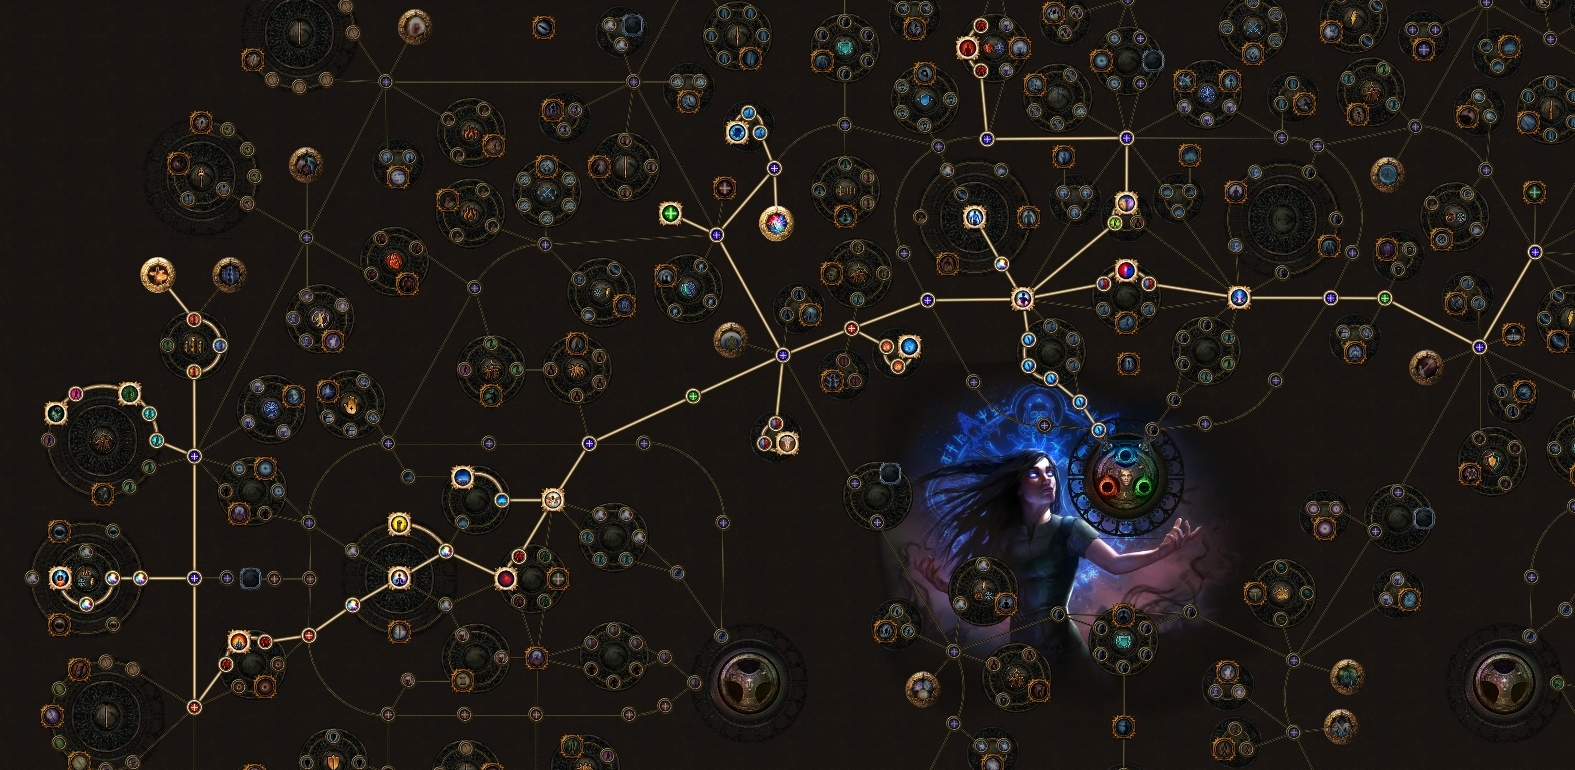
ACT 8
> The Toxic Conduits > Doedre's Cesspool + Open Loose Crate > The Cauldron + Kill Doedre the Vile > Sewer Outlet + Get WP > The Quay + Open Sealed Casket & take Ankh of Eternity > Resurrection Site + Kill Tolman > The Grain Gate + Get WP + Kill Gemling Legionnaires > The Imperial Fields + Get WP > The Solaris Temple Level 1 + Get WP > The Solaris Temple Level 2 + Kill Dawn & take Sun Orb < Maramoa + Clarissa > The Solaris Temple Level 1 > The Solaris Concourse + Get WP > The Harbour Bridge > The Lunaris Concourse + Get WP > The Lunaris Temple Level 1 + Get WP > The Lunaris Temple Level 2 + Kill Dusk & take Moon Orb > The Solaris Concourse/The Lunaris Concourse > The Harbour Bridge > The Sky Shrine + Kill Solaris & Lunaris > The Blood Aqueduct > Highgate
Passive Tree
PoE Website Path of Building: 'End of Act 8' tree 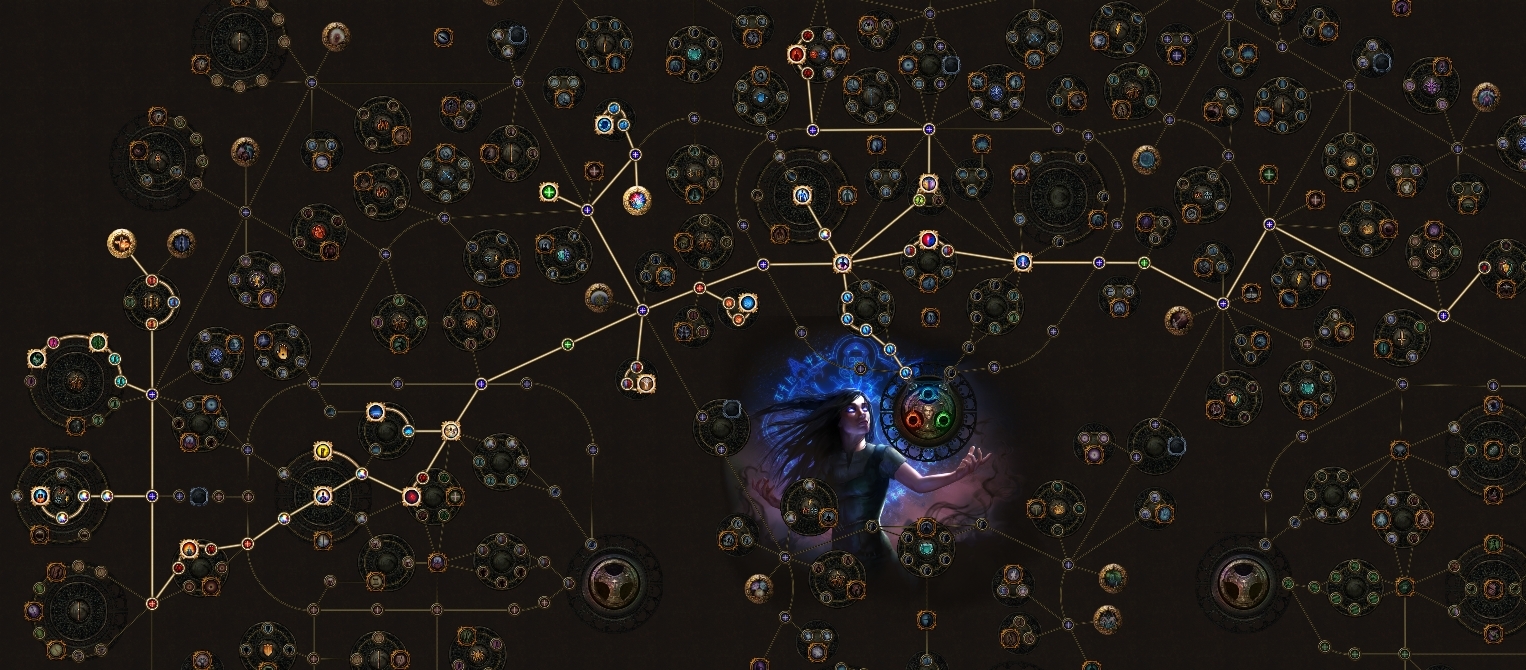
ACT 9
It's a good idea to do 2 to 5 runs of Blood Aqueduct to gain a little bit of xp and find better gear > The Descent > Supply Hoist > Supply Hoist > The Vastiri Desert + Get WP > The Foothills + Get WP > The Boiling Lake + Kill The Basilisk & take Basilisk Acid > The Foothills > The Tunnel + Complete Lab (2/3) + Get WP > The Quarry + Get WP > Shrine of the Winds + Kill Garukhan < Irasha > The Quarry > The Refinery + Kill General Adus + Open Theurgic Precipitate Machine & take Trarthan Powder < Sin > The Quarry + Talk to Sin > The Belly of the Beast > The Rotting Core > Shavronne's Sorrow + Kill Shavronne > Doedre's Despair + Kill Doedre > Maligaro's Misery + Kill Maligaro > The Rotting Core + Talk to Sin > The Black Heart + Kill The Depraved Trinity + Talk to Lily > Sail to Oriath
Passive Tree
PoE Website Path of Building: 'End of Act 9' tree 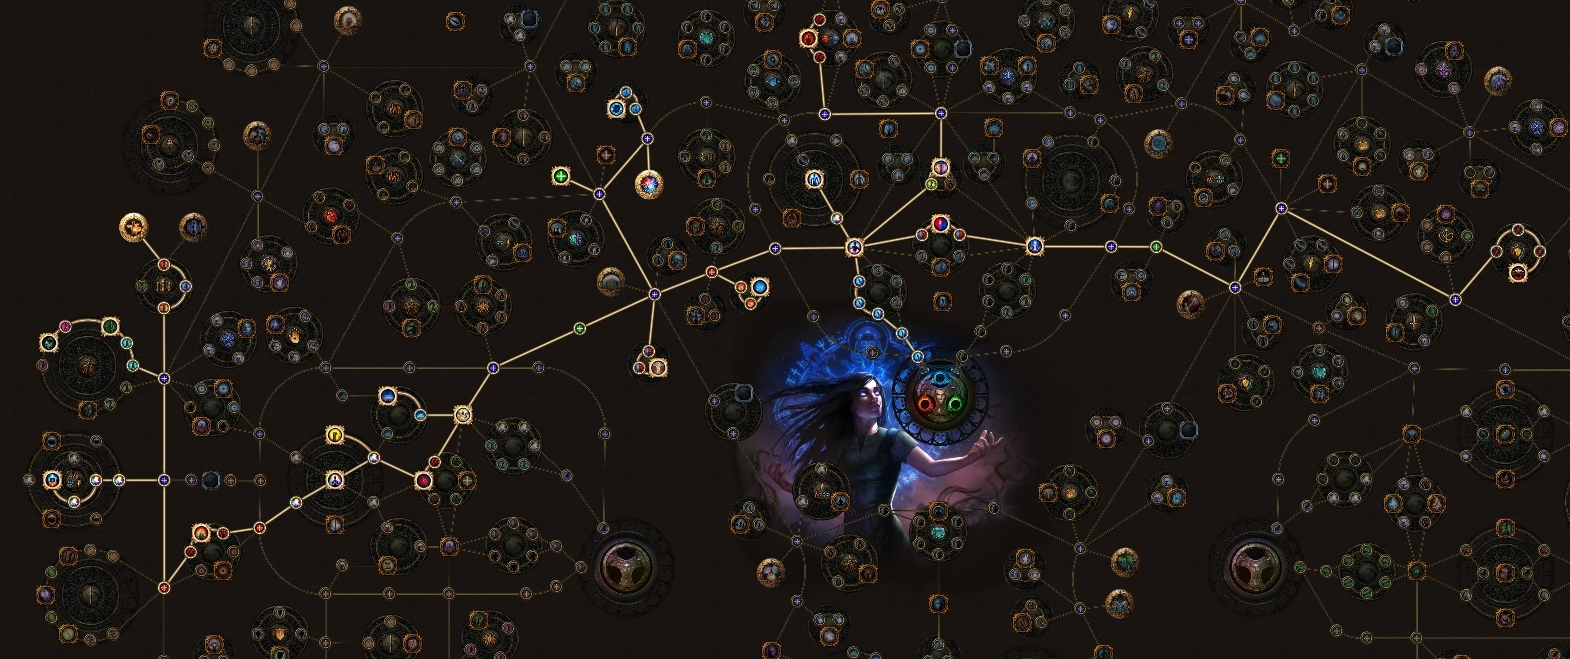
ACT 10
> The Cathedral Rooftop > Cathedral Apex + Kill Kitava's Cultists > The Cathedral Rooftop > The Ravaged Square + Get WP > The Ossuary > The Bone Pits + Find Elixir of Allure + Complete Lab (2/3) < Weylam Now we catch up on skill points missed earlier, you should be able to easily one shot these bosses. > The Lunaris Concourse (ACT 8) > The Bath House + Complete Lab (1/3) > The High Gardens > The Pools of Terror + Kill Yugul < Hargan (ACT 8) > Prisoner's Gate (ACT 6) > Valley of the Fire Drinker + Fight Abberath > The Cloven Pass > Valley of the Soul Drinker + Kill Abberath > The Riverways > The Wetlands > The Spawning Ground + Kill The Puppet Mistress < Bestel & Tarkleigh (ACT 6) > The Northern Forest (ACT 7) > The Dread Thicket > The Den of Despair + Kill Gruthkul < Eramir (ACT 7)
Passive Tree
PoE Website Path of Building: 'Before Merciless Labyrinth' tree 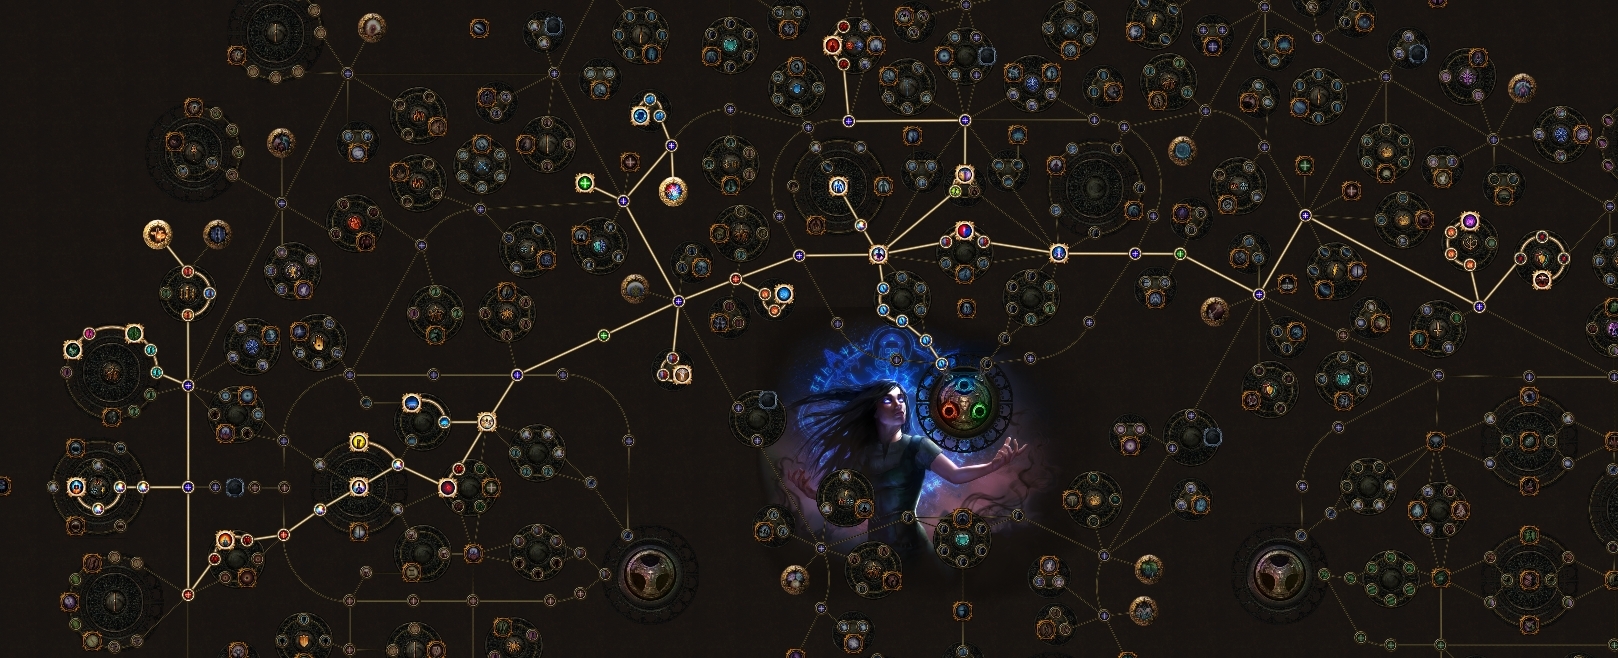 > The Aspirant's Plaza + Complete Merciless Labyrinth PoE Lab notes - Look for Darkshrines to make it easier Take Pendulum of Destruction > The Ravaged Square > The Torched Courts > The Desecrated Chambers + Get WP > Sanctum of Innocence + Kill Avarius & take Staff of Purity < Bannon > The Ravaged Square + Talk to Innocence > The Canals > The Feeding Through + Talk to Sin > Altar of Hunger + Kill Kitava < Lani
Passive Tree
PoE Website Path of Building: 'After Kitava' tree 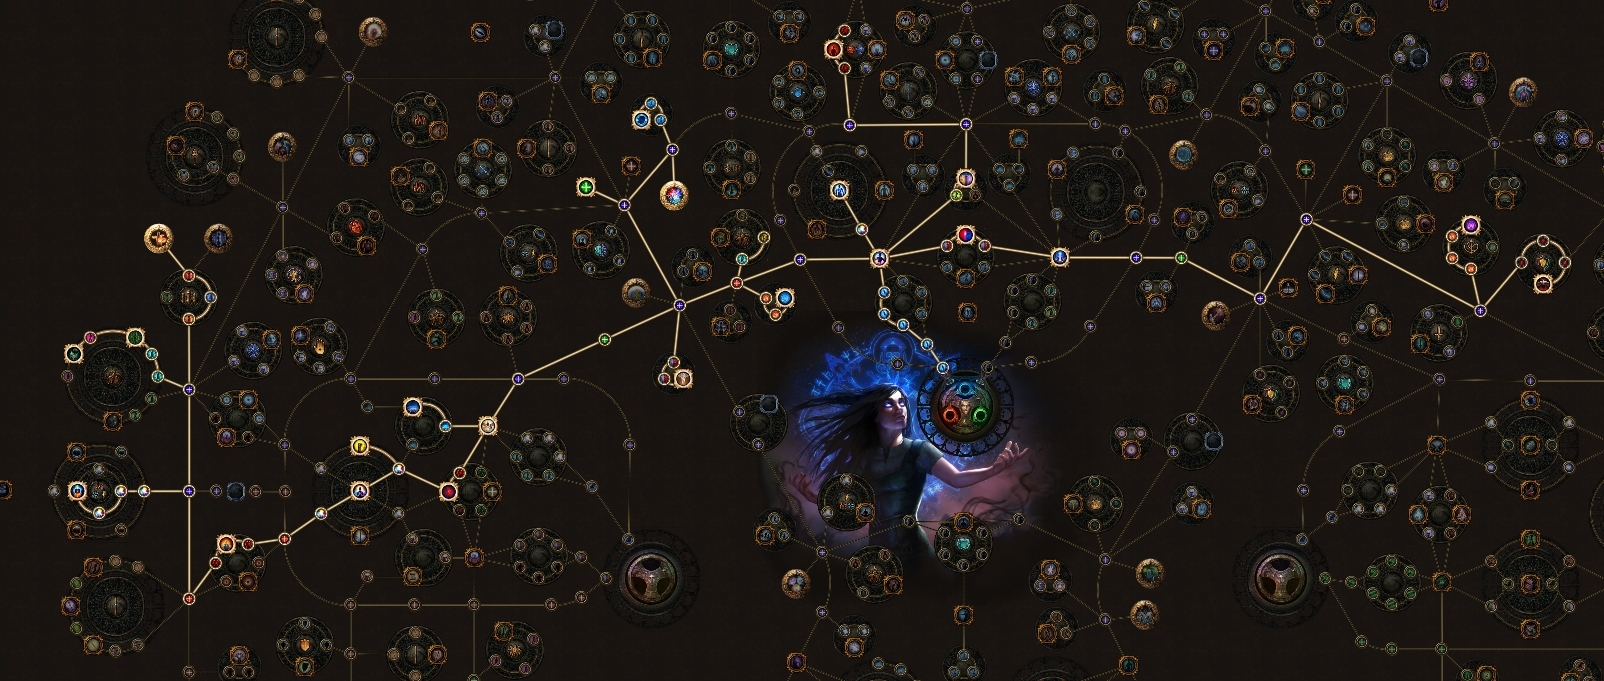 Zuletzt bearbeitet von ShermanDiablo#7529 um 06.09.2019, 15:29:18 Zuletzt angestoßen am 12.02.2021, 17:34:54
|
|
|
- Reserved -
|
|
|
Kreygasm
|
|
|
Reserved
|
|
|
~~RESERVED~~
First off, Thank you for the Guide, I have not yet started, but I will be keeping everyone informed on how this guide helps me to get to endgame, and hopefully get my first atlas completion, or shaper kill, or atziri kill, or T3 Corruption chamber, or Delve below 100, Thank You Sherman. I will try my best to not get stuck in doorways, and stay calm when navigating Labyrinth traps. Cheers! LordBeverin - Public Relations and Accountability
(☞゚ヮ゚)☞(☞゚ヮ゚)☞(☞゚ヮ゚)☞🔴🟡⚫🟤☜(゚ヮ゚☜)☜(゚ヮ゚☜)☜(゚ヮ゚☜) a.k.a. Beverin, a.k.a Bev, a.k.a. It's Bev, Not Bever, a.k.a It's Not Beaver. ☆*: .。. o(≧▽≦)o .。.:*☆ 🔴🟡⚫🟤 (╯°□°)╯︵ ┻━┻ ╰(‵□′)╯ |
|
|
Well done, concise. Congrats
|
|
|
any gearadvice/gewmsetup sections?
|
|
" For gear, just aim for life and filling out resists, you may need a jade amulet early on to keep up with dex requirements. On your weapons look for spell/lightning damage and flat cold. Gem setups are shown throughout the guide everytime something is added/removed/changed. |
|
|
Very nice, added to favourites.
I just hope they will not nerf storm brand, lol. Zuletzt bearbeitet von hwat#0315 um 09.02.2019, 01:44:40
|
|
|
If anyone gets use out of this to get to maps, or even get their quickest character to maps, I would love some feedback! Great time to practice in preparation for the next league!
|
|


